top of page


PROJECT: ABERRATION is a first person extraction roguelike for 1-3 players. Explore a broken, and strange, modern environment full of loot, enemies, and unique points of interest. The goal of this project is to put creativity into the players hands as much as possible. With a highly robust attachment system, modification system, and tweaks players can do to their entire build, Project Aberration features deep gameplay systems. This all is built on semi-procedural animations and strong use of structures and data tables. This focus in the backend system for the game
SOLO PROJECT
CREATED ALL GAME DESIGN AND LAYOUTS
DESIGNED ALL SYSTEMS
IMPLEMENTED ANIMATION BLUEPRINTS
ART FROM FAB/EGS
SYSTEM FEATURES

Creativity is the limit of the weapon and attachment system by creating completely unique weapons with procedural animations for each one

Each enemy type needs to be handled differently in order to succeed at each unique encounter.

Unique weapons provide special power or techniques that the player can utilize to craft their own builds

A system that allows you to be the player you want to be
EQUIPMENT SYSTEM
EQUIPMENT SYSTEM

The equipment and attachment system is the major feature of this Project Aberrant. The design philosophy and goal for the game was to drive player creativity and allow for full customization of their gameplay kit. The equipment, and by extension gameplay, mechanics put the player first and their personalized gameplay styles as the priority for the game. The equipment system features 10 ranged weapons, 4 melee weapons, 4 types of throwables, and 2 consumables. There are a massive amount of attachments which allow any equipment to be customized to fit any playstyle that the player wants to focus on.
The attachment system drives the parameter, and further, changes to each weapon type. These can be basic, such as handling speed, accuracy, or damage type. The attachments can also go further to change a lot of fundamentals for the weapon itself. These attachments also modify the anim blueprints and provide visual or structural changes for the equipment as a whole.

This example displays that the revolver can be fitted with shotgun shells and an attachment to make the spread only vertical. This provides a solution to flying enemies or targets that move vertically, but it does change how the weapon is treated in any situation
This example is adding a burst shot to a sniper or marksman rifle. A weapon will have alternative numbers adjusted based on the attachments. This rifle will do less damage per shot, due to the burst modifier, but is able to fire much faster in return.


To further expand on the customizability and the unique play styles that are supported by the equipment system, the ammo system benefits it as well. Each weapon comes with a standard ammo type or magazine. In order to allow the customization, each weapon can change their ammo type, resulting in a higher or lower damage, ammo count, and fire rate.

These magazines allow builds or perks around carrying certain types of ammo. It also helps players be prepared against bosses that may be weak against one type or another

Mods are pickups, purchases, or craftables that apply unique effects to different weapons. These can be bouncing, homing, fire, lightning, healing, or even on hit effects. They allow a player to add depth to their build for those who want new effects, but also those who want to min-max their gameplay since it is a roguelike game with a power fantasy cap. Attachments can be attached to any weapon, including melee weapons, giving a little bit more depth to the gameplay
For example, the fire bonus allows shots to light an enemy on fire, which can stack with other mods or passive to apply bonus damage.


A unique weapon is one of a set, a specific enemy drop, or a craftable. They have special effects that are only applied to that weapon in the form of a special mod. The mods can not be removed or replaced if they are unique. This is because the weapons are build/playstyle definers. Each weapon provides a special variation of how the player interacts with the combat system.

The unique weapon “Cerberus”, acquired from enemies that die to fire, has three levels of charged shots which thematically matches the myth of “Cerberus”. This effect can’t be removed but provides a different approach to assorted encounters.
This unique weapon is unable to fire during ADS, but instead marks enemies that are “painted” by the reticle. This removes accurate shots, but while hip firing, bullets will magnetize to the painted enemies. This, like the cerberus, allows different builds to take shape and provide more tools for players.


The stats that are attached to the weapon are changeable with the different attachments which often provide boons and disadvantages that shape how the player can build each weapon type. As more attachments are unlocked, the stats on weapons can easily be pushed in one direction or another to make something unique that no other player has created.

In-Game menus also provide weapon stats for players. These provide alternative locations for players to get their information, specifically to check buffs, debuffs, or other modifiers currently active.

Each weapon's damage values were tested based on mag size, ammo type, damage per shot, and reload speed. This lets each weapon be compared with one another and find the average speed to take down an enemy. This was used as the preliminary balancing for each weapon before getting them into the play tester's hands. A new weapon could easily be tested with their parameters to test if it fits the current roster of weapons based on their outputs. These data table produced the initial values and was used to test edge case scenarios, frame perfect advantages, etc.

This is the data table that is used by each weapon. It is designed to be an exact copy of the table used on the excel sheet. This allows developers to quickly port in any information that they may be missing or any updates without having access to the game code itself. This also allows pure balance members to do their job without interrupting the code or having to open it at all.
These are the comparisons between the tech sniper and the standard. The key difference is that the tech sniper fires faster and more consistently so the dps is higher, but the standard rifle provides consistent head shot single shots.

COMBAT SYSTEM
COMBAT SYSTEM

The combat system is relatively basic but is designed to be a sandbox experience for the equipment outlined above. Each encounter is designed to allow the player different opportunities to utilize their own gameplay kits that they created on their own. The combat damage formula is very straightforward for this title. The damage is calculated against the target point of the enemy, such as weak or armour points, and then reduced by the target's flat defence. This keeps damage values consistent and expected which is important for a game that is roguelike by nature.

Weak points and armoured damage provide skill based expression for enemy targets. Certain weapons, modifications, and attachments can increase damage dealt to one of the two. The damage is multiplied on the base enemy by either 1.6 or 0.6 respectively. That multiplied damage is the final received damage post defense for the target as well.
Armour and weak points are also varied per enemy spawn. Certain targets can have a weak point on their shoulder and the other enemy could have one on the knee. The armour can also randomly change. These changes are done based on different skeletal bones and the new additions are physics welded to the actor


Certain limbs, or weapons, of enemies can be shot to remove them from the combat equation, making it potentially easier for players to fight these different encounters. This can be done for certain mechanical enemies or those with damaging arms/legs. The targetable limbs are also only those directly associated with combat. This prevents the need for excessive procedural animation for each enemy type based on how their movement options were handicapped by the player

This is done by spawning a physics based version of the limb while setting the bone visibility in the skeleton to zero. It lets animations be able to play as if they were there, but without the need to make fully procedural enemy animations
EQUIPMENT IMPLEMENTATION
EQUIPMENT IMPLEMENTATION

The equipment was implemented as modularly as possible and using parent-child relationships so that each weapon had access to the same options. Because of the amount of attachments, variations, and modifications that each weapon can have, each weapon needed to have the same components to ensure all of those worked the same way. This also let the weapons be modified much easier when something needs to be sped up or slowed down across all weapon types.

Each ranged weapon uses the same class with an input for a data table row handle. That handle connects to the database to hold the default information for each weapon. It controls the placement of the weapon in the players hand, the weapon skeletal mesh, and the animation blueprint attached to the class for any form of firing/reloading animation

Each weapon uses the same firing technique, activated by enabling or disabling the input system on the currently equipped weapon. As the weapon is fired, it runs different checks on things such as burst, shotgun, fully automatic, or manual reload. That controls the behaviour of each weapon and is shared throughout each one
The burst can be applied with so many different attachments, so they are handled as the shot is created, so not resulting in situations where the burst can be doubled up.


When the weapon reloads, it BPI messages the player to confirm that they have access to the spare ammunition available to do the reload, if they do, the montage plays. While playing, there are different notifies to turn on or off the left hand holding the weapon. A notify also runs when the weapon’s ammo is restored or not.
Reload is handled, visually, by attaching the players hand to the MagHold bone on all weapons. This is moved around during reload, so the hand is always able to look like it is not only holding the weapon, but also providing movement in the wrist and the fingers as well. This is done via IK targeting in the animation blueprint by reading bones sent by the weapon
When a weapon is swapped, the weapon store animation is played with a modifier on the play rate based on the handling of the weapon. At the peak of the animation (hand hidden), the weapons swap their current visibility.


The mods are checked at different points on the firing/reloading chain depending on the use of it. An example of that is the time split mod, which causes an aoe laser burst on hitting a target. That mod is used to help clear out areas that are dense with enemy mobs.

This mod, for instance, is activated by spawning a random angle line with the midpoint at the point of impact. The distance of each line end point is changed based on the actor bounds of the enemy target, always able to encapsulate it when the enemy takes damage and potentially spread to another target


The melee weapons use a different class since each weapon is split into one of three categories, two handed, one handed, or dual weapon. Those melee weapons have information in their own melee database for the attack type, amount of combos, time between combos, and their attack speed.

The weapon database of the melee weapon contains several different options for each weapon. The skeletal mesh and the animation blueprints are also stored here. Any form of unique weapon mod or unique effects are added into this table.
Just like the weapons, they still belong to a single master class. This commands what the player is allowed to do with the melee weapon in their hands.

ANIMATION IMPLEMENTATION
ANIMATION IMPLEMENTATION
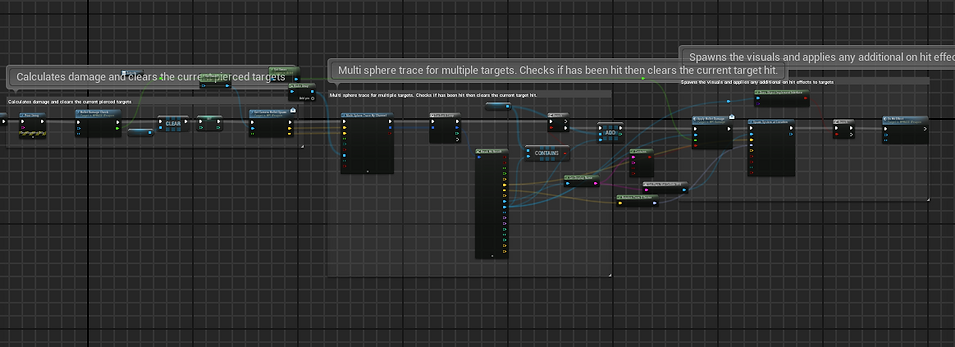
![AnimationBPOverview].png](https://static.wixstatic.com/media/8c2de5_cfeabf3a045f432fb95b889945ef2ce1~mv2.png/v1/crop/x_0,y_63,w_1524,h_767/fill/w_823,h_414,al_c,q_85,usm_0.66_1.00_0.01,enc_avif,quality_auto/AnimationBPOverview%5D.png)
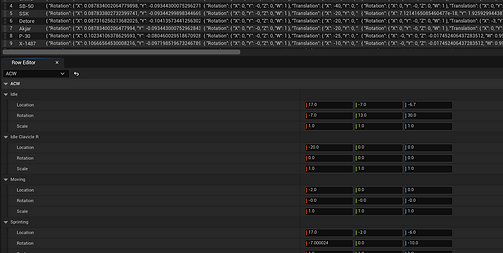
The animations were heavily based on both procedural and IK/FK animation work. The animations are modified by the weapon and the hand location on each weapon. They also have a unique data table entry to customize each animation down to .001 movement in any direction. This allows a developer who is working on the visuals of each weapon to be able to customize the base animations in any direction that they want to push it. For example, the standard AR weapon sprint could look different on each weapon, but only use a single key frame animation.
The weapon database of the melee weapon contains several different options for each weapon. The skeletal mesh and the animation blueprints are also stored here. Any form of unique weapon mod or unique effects are added into this table.

Each weapon has several different bones and sockets that are added to handle the attachment locations and the scales for each weapon type. They are tested with the different attachment slots, such as barrel, and scope. Each attachment that changes the distance of the weapon from back to front also modifies where the weapon sits on the screen to prevent taking too much space
Those attachment slots are used in the weapon blueprint to attach the visuals of the attachment onto the weapon. These are also used as checks to confirm if the player has something attached to the stock or barrel. That runs the boolean whether or not to add the extra distance to the right clavicle

The ADS point is the distance between the socket and where the eye should lie. It dynamically adjusts the location of the weapon so that the ADS middle point, reticle, is always in line with the rest of the weapon without taking up too much space. It even pushes the weapon down as well. This is a set virtual bone on each scope static mesh.

This shows the weapon being pushed down based on the attached scope. This prevents clipping with the camera, other objects, or other items in general. It also prevents too much of the screen being covered by an object.

Both weapons, the Guidance (revolver) and the ACWR (Auto rifle) use the exact same walking and running animation. They are procedurally changed based on the weapon data that was placed in the weapon information database. The angle, height, and other pieces all change the weapon reload information.

The animation blueprint also handles non-weapon related actions and the notifies that come in/out of them. This shows the different IK/FK snapping that occurs to ensure that the weapon socket and the IK bone are linked up. This lets custom weapon animation reloads where the gun leaves the hand if possible.
The reload animations extend the procedural animation because the arms of the player are never animated. The weapon itself has the magazine animated and notifies to turn on and off the left hand snapping. This makes the left hand attach to the magazine and follow it closely so that the animation always looks correct when moved with the magazine of the weapon


When animations are too specific to be procedural, they are either used from a fab content pack or created using the Unreal Engine Mannequin IK/FK rig. This lets them be constant with one another and look as if they are from the same content pack in the first place.
A timeline is used in place of the animation attached head bob or recoil. It makes changes to the controller’s eye rotation and then those are saved back to the player pawn. This prevents any situation where animation skipping or canceling can avoid these important parts of the game feel.

PLAYER IMPLEMENTATION
PLAYER IMPLEMENTATION

The player is a standard pawn that has movement and input capabilities built in. It is a handler that controls what is currently equipped and holds some stats for the player, such as their defense, max hp, and their ammo counts. It also was the main check for inputs that are sent from the controller to the different peripherals of the player. Since the majority of the gameplay occurs in other places, such as the weapons or equipment, the player acts as the middle man to control input from the controller to where it needs to go. It is a stat house primarily.

There are a variety of different checks on the player to ensure that certain animation cancels are not possible or that double-uped effects are not possible as well. These include things like no reload while using a consumable, break ADS when weapon swap, etc.


When weapons are swapped, as shown above, different messages are sent to the correct weapon based on the currently selected weapon type. If the checks are valid, it proceeds. This prevents situations where the player loses the ability to swap, reload, or shoot because the animation was canceled or hot swapped too fast.

The recoil effect is being driven by a timeline located in the player. The weapons send a message with the recoil data (max, min, left right) values and then those are split by a function so the timeline adds the correct recoil.

The timeline adds to the controller axis so that animation can’t be overwritten and the recoil must be run. The controller master component on the player pawn is then controlled by those new values. This also lets recoil combine smoothly with head bob for sprinting and walking
The data base for each weapon holds the same recoil information. This recoil information is passed to the player each time that the fire button is hit so that it can be additively applied to the same recoil pattern. This also allows each weapon to have a slightly different randomized recoil left, right, up, or even down but be able to return to the start.


Interaction is handled both in the anim BP and the player. The animation blueprint is fully procedural, taking where the interaction point is in the world, then moving the players hand to match that location. It makes it look cleaner, just like a light turning on with a push or items being grabbed off a table.

The player is also emitting a line trace from the camera to the tip of the gun + a few units. This determines if a gun would be colliding with the wall. Instead of shrinking the arms, the player instead lowers the weapon. This is done via a procedural animation that changes based on how much of the trace is currently in the wall.
INVENTORY AND UI
INVENTORY AND UI

The inventory and ui function as a companion to the gameplay systems that are occurring in the game world. The primary inventory system allows players to equip, change, delete, store, buy, or sell items quickly and easily. The UI is primarily run via several binds that bind different stats to part of the data table or the weapon component itself. As the weapon options expand, by building it this way, the menu can also expand very easily to fit each new component as easily as possible.

The hud is very simple, as it is just a project style. It does, however, pull from the weapon and binds to be able to see the ammo count, secondary count, and the weapon icons. There are a few messages sent to the UI based on what happens during the combat system.

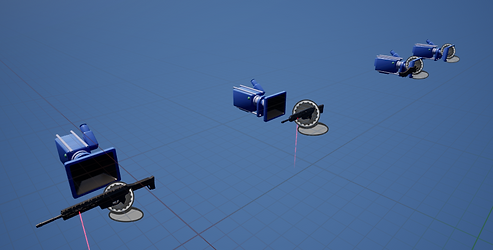
Each weapon and equippable item in the game has their images either generated in photoshop then brought in, or are generated while the game is played. These are done via a blueprint that serves as a replica of the players gun, without any of the combat functions. This blueprint uses a render target to take a photo of, and mask out, the weapon itself to show the attachments on the weapon at all times.

The distance scale out and the location of the render target changes based on the physics size of the weapon or item. It grabs the center of the collision and then generates the information based on how wide the collision is.
The item is hidden under the map so it can’t be interacted with and receives messages via a BPI to update everytime that the player's weapon updates.

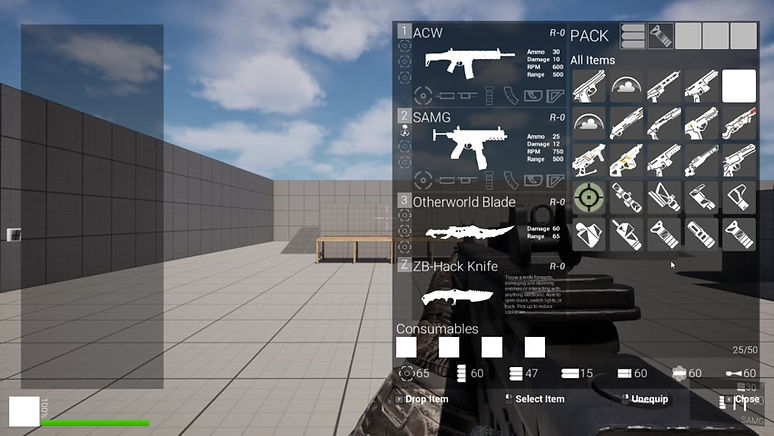
The inventory ui holds all information about what weapon is equipped, ammo types, consumables, and more. This UI features a drag and drop function to move anything around on the screen, onto weapons, into the shop, or even into storage for the player. This is done via several different components that all work together

This code pulls data into the inventory using a grid layout. This grid layout has children actors which handle when they are clicked and dragged in the first place.
The inventory weapon data is bound via a text or image function and that pulls it straight from the weapon in either slot in the first place.


The items are dragged by spawning a widget attached to the cursor location. This is moved and, upon clicking, reads what is under the cursor to tell that it has been clicked on.

The shop inventory uses a barter system that compares the price of what is purchased to the price of what you are selling. This can be seen in games like Baldurs Gate 3 or Escape From Tarkov to make the selling feel more lifelike. This uses the same function as above, pulling data into the shop and converting them into grid layout components.

The storage system is designed to hold any item that the player does not want to hold onto. This can be currency, attachments, mods, weapons, or equipment in general. When players die, this storage system is not affected at all.
bottom of page